Webhooks: Triggering Employee Webhooks
To trigger a webhook, first ensure that your webhook events are set up. If not, see: Creating Webhooks.
Creating and Approving an Employee to Trigger “employee.created”
Section titled “Creating and Approving an Employee to Trigger “employee.created””To create an employee, go to Staff > Personal Files and click the create button in the top left corner:

If the employee is whitelisted, the employee.created event will be triggered, and a new webhook message containing relevant data will be created and put in a fast message queue to be delivered to the configured receiving end-point as soon as possible. Otherwise the employee needs to be whitelisted before any events will be triggered for that employee. Once they are whitelisted you can approve the employee, which will trigger the employee.created event.

Updating an Employee to Trigger “employee.updated” or “employment.ended”
Section titled “Updating an Employee to Trigger “employee.updated” or “employment.ended””Instant Creation and Transmission of Update
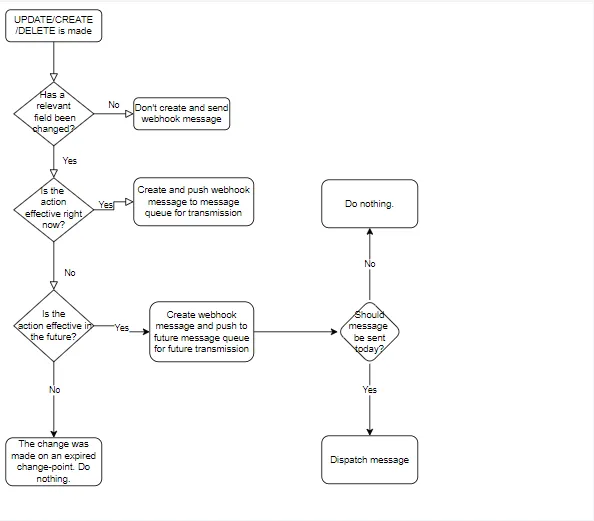
Section titled “Instant Creation and Transmission of Update”If an update to the employee or the employee’s employment is made on a relevant field (Example Payloads - Classic Webhooks) a employee.updated or employment.ended message will be created and put in the message fast queue for instant transmission - if those events are present in the webhook configuration and the changes are effective at the time of the update.
Future Updates and Transmission of Updates
Section titled “Future Updates and Transmission of Updates”Certain changes can be scheduled in the future, such as the employment end date or the employee’s profession. If a future update is created, a change point on the employee is created. An employee change point can be viewed on the employee’s employment page:

Potential future changes are not sent to the message queue immediately but are stored in a queue table - awaiting transmission on the date the update takes effect. Future messages to be sent are retrieved by a background task that fetches future messages that are in effect every fifth hour. The retrieved future messages will then be sent to the fast message queue for immediate transmission to the configured receiving end-point.
Deleting an Employee to Trigger “employee.deleted”
Section titled “Deleting an Employee to Trigger “employee.deleted””If an employee is deleted, a employee.deleted message is created and is sent to the fast message queue or immediate transmission to the configured receiving end-point. To delete an employee, go to Staff > Personal Files and click on the delete button in the top right corner of the Personal Information-section:

Hide an Employee to Trigger “employee.enabled”
Section titled “Hide an Employee to Trigger “employee.enabled””To hide an employee, navigate to Staff > Employment, click the show more button in the upper right corner, and select Hide Person. The event will trigger both when the box is checked and unchecked but with the Enabled field set to false if the employee is set to hidden and true if the employee is set to visible.
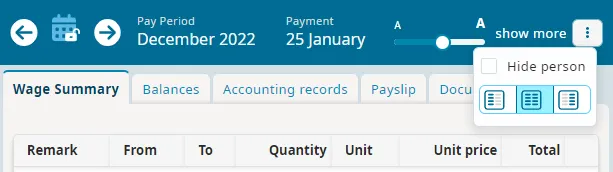
It’s not possible to hide employees with active employments. If an employment is added to an employee that is hidden they will become visible, which will trigger the employee.enabled event as well as the employee.updated event.
Unhide an Employee to Trigger “employee.enabled”
Section titled “Unhide an Employee to Trigger “employee.enabled””To unhide an employee you can either follow the steps mentioned above an unselect the Hide person checkbox. This results in an employee.enabled message being sent.
Alternatively, you can unhide an employee by giving it an employment. This results in an employee-enabled message, followed by an employee.updated message containing the new employment. If the employment is to be activated in the future, the employee.updated-message will be queued and sent on the day the employment takes effect.
Initializing System by triggering the “employee.created” event for all employees
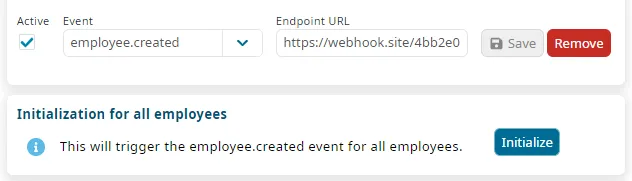
Section titled “Initializing System by triggering the “employee.created” event for all employees”To manually trigger the employee.created event for all currently approved employees you need at least one active webhook subscribing to said event. When you press the initialization button you will receive a message for each employee as if they have just been approved. You will then need to wait at least 10 minutes before you are allowed to rerun the initialization.